The projects fully designed from simple and most common stitches can look amazing. That, and also simplicity, are the two main reasons why there are so many of such designs. Can you count how many times you’ve seen a sweater mostly made of double crochet stitches in various combinations?
Most of all I love making sweaters, and the tricks I’m going to share are quite handy for them. However, these tricks can be used for other projects, too, especially in clothing category.
Un-holy double crochet pieces
The first trick is for when you want to make your project of double crochet stitches, but you’d like to avoid big gaps in between the stitches.
Here you go - ldc (linked double crochet) for the rescue!
The ldc stitch is a close relative of a simple dc (double crochet); the only difference that the stitches in a row are connected to each other in the middle. That is achieved by starting not with yarn over, but with inserting a hook in the middle of a previous stitch and pulling a loop that will replace the yarn over. After that, you continue as if it’s a normal dc.
Here is a step-by-step instruction on how to crochet an ldc stitch:
make a dc (1 loop on hook).
insert hook in the middle horizontal bar of your dc (that single horizontal string) from top to bottom.
yarn over, pull up a loop (2 loops on hook).
insert hook in next stitch,
yarn over, pull up a loop (3 loops on hook).
yarn over, pull through 2 loops (2 loops on hook).
yarn over, pull through 2 loops (1 loop on hook).

now you have two stitches: dc, ldc.
continue by inserting the hook in the middle bar of ldc, and so on.
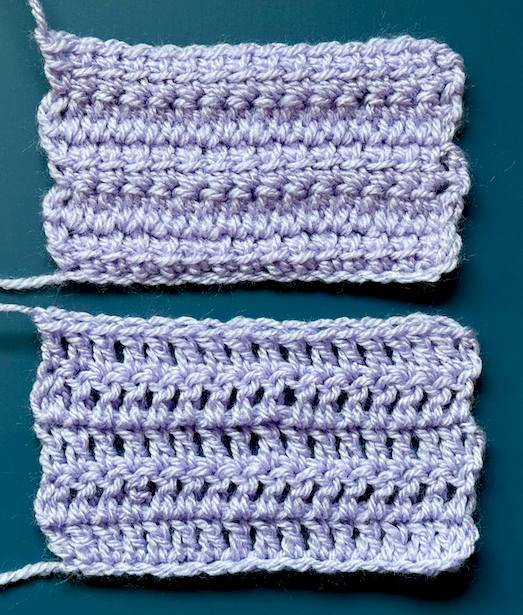
I must admit, the result doesn’t look like it’s made of double crochet stitches anymore - it looks different, but really nice. You’ll get a piece where all stitches are interconnected, and there are no gaps. The simplicity and the speed are still there.
Here’s the difference between a sample made with 5 rows of dc (bottom) and 5 rows of ldc (top).
Stretchy edges
Ever had this problem that your piece is stretchy enough, except that very edge where you started with the row of chain stitches? It’s especially annoying when the bottom of your sweater doesn’t stretch!
This is where foundation stitches will help you!
For example, instead of starting with a chain and then putting a row of double crochet on top, you can start immediately making fdc (foundation double crochet) stitches.
Another win - if you are not sure how many stitches you’ll need, you can immediately see and evaluate as you go.
How to make an fdc stitch:
make a slip knot on your hook, ch 3 (counts as first dc).
yarn over, insert hook into the first ch you made (near slip knot).
yarn over, pull up a loop (3 loops on hook).
yarn over, pull through 1 loop (forms a foundation ch).
yarn over, pull through 2 loops.
yarn over, pull through last 2 loops.

to make the next one:
yarn over, insert hook into foundation ch you just made at the bottom of the previous stitch.
yarn over, pull up a loop (3 loops on hook).
yarn over, pull through 1 loop (new ch).
yarn over, pull through 2 loops.
yarn over, pull through 2 loops.

repeat as many times as needed
Does it really look like a regular dc row? You can probably spot a teeny-tiny difference: it’s ever so slightly shorter, and the bottom looks just a little different. But nobody will question that it’s a row of dc stitches.
Judge for yourself, here are the pictures (pay attention to the bottom row of each sample). Can you tell which one is the “classic” approach? :)
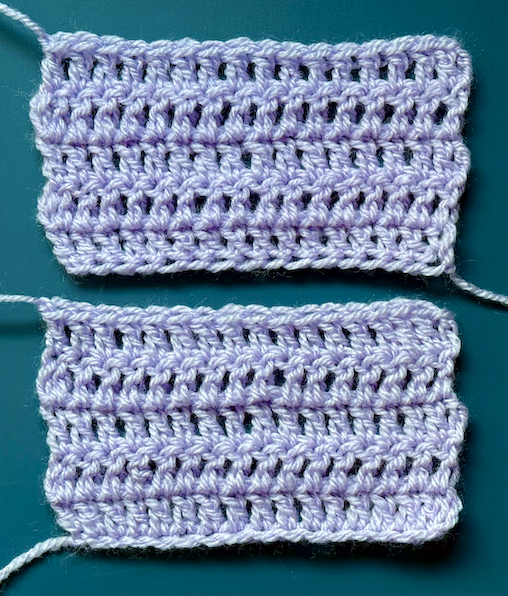
Yes, it’s the bottom one.
Conclusion
These are tricks that can be handy in some cases. As always, there is a good use for each tool in your toolbox if you use it right.
I was showcasing these tricks on dc stitches, but of course, you can use it for shorter or taller stitches just as well!
